April 2024 - This site, and Kamaelia are being updated. There is significant work needed, and PRs are welcome.
Cookbook
How can I...?
Other ways of using Kamaelia
This section contains a number of examples in a number of different application areas. These are all included in the Kamaelia distribution, but are provided here for convenience. See also the documentation in the older structure.
Last Editted: Patrick, 03 Aug 2007
Linking components together
Cookbook : Pipelines and Graphlines
Discussion Please discuss this on the discussion page for this page
Fairly early on you'll want a quick an easy way to link your
components together. To actually build a useful system you need to set
up linkages to get data from one component's outbox to another
component's inbox. Pipelines and Graphlines are the
two simplest and most common ways of doing this.
Find out more about using Pipelines here
Pipeline and Graphline are, themselves, components. Pipeline wires
components together in a long chain. For example:
from Kamaelia.Chassis.Pipeline import Pipeline

from Kamaelia.Internet.Multicast_transceiver import Multicast_transceiver
from Kamaelia.Protocol.SimpleReliableMulticast import SRM_Sender
from Kamaelia.Protocol.Packetise import MaxSizePacketiser

Pipeline( RateControlledFileReader("myaudio.mp3",readmode="bytes",rate=128000/8),
          SRM_Sender(),
          MaxSizePacketiser(),
          Multicast_transceiver("0.0.0.0", 0, "224.168.2.9", 1600),
        ).run()
Find out more about Graphlines here
Whereas a Graphline wires components together in any way you want -
you specify each individual link. For example:
from Kamaelia.UI.Pygame.Button import Button
from Kamaelia.UI.Pygame.Image import Image

from Kamaelia.Util.Chooser import Chooser

from Kamaelia.Chassis.Graphline import Graphline

files = [ "slide1.gif", "slide2.gif", .... "slide99.gif" ]

Graphline(
     CHOOSER  = Chooser(files),
     IMAGE    = Image(size=(800,600), position=(8,48)),
     NEXT     = Button(caption="Next",     msg="NEXT", position=(72,8)  ),
     PREVIOUS = Button(caption="Previous", msg="PREV" ,position=(8,8)   ),
     FIRST    = Button(caption="First",    msg="FIRST",position=(256,8) ),
     LAST     = Button(caption="Last",     msg="LAST" ,position=(320,8) ),
     linkages = {
        ("NEXT",     "outbox") : ("CHOOSER", "inbox"),
        ("PREVIOUS", "outbox") : ("CHOOSER", "inbox"),
        ("FIRST",    "outbox") : ("CHOOSER", "inbox"),
        ("LAST",     "outbox") : ("CHOOSER", "inbox"),

        ("CHOOSER",  "outbox") : ("IMAGE",   "inbox"),
     }
).run()
-- 17 Dec 2006 - Matt Hammond
Cookbook : Pipelines
Pipelines are one of the simplest ways to wire components together. A
Pipeline wires components together in a long chain.
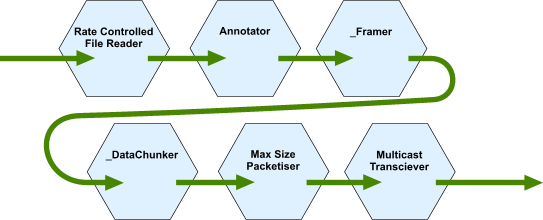
Here's a simple pipeline we want to build that sends a file over
multicast, using a simple protocol to ensure reliable
transmission:
We could build this by writing a new component with a whole bunch of
self.link() calls to link each outbox to the next inbox. But that is a
lot of code to write and rather tedious! ... surely there must be an
easier way?
... And so the Pipeline component comes to the rescue! No need to write
a whole new component, simply use a Pipeline component like this:
from Kamaelia.Chassis.Pipeline import Pipeline

from Kamaelia.Internet.Multicast_transceiver import Multicast_transceiver
from Kamaelia.Protocol.SimpleReliableMulticast import Annotator
from Kamaelia.Protocol.SimpleReliableMulticast import _Framer
from Kamaelia.Protocol.SimpleReliableMulticast import _DataChunker
from Kamaelia.Protocol.Packetise import MaxSizePacketiser
from Kamaelia.File.Reading import RateControlledFileReader

Pipeline( RateControlledFileReader("myaudio.mp3",readmode="bytes",rate=128000/8),
          Annotator(),
          _Framer(),
          _DataChunker(),
          MaxSizePacketiser(),
          Multicast_transceiver("0.0.0.0", 0, "224.168.2.9", 1600),
        ).run()
You can find this code in
Kamaelia/Examples/Multicast/SimpleReliableMulticast
So what did Pipeline actually do?
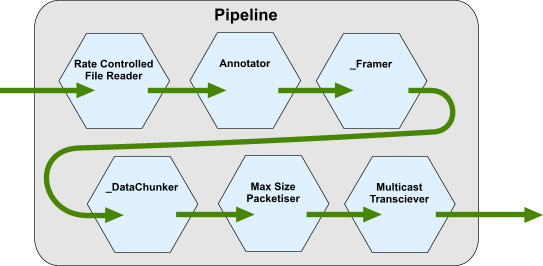
It wires the components into a chain inside itself - linking outboxes
to inboxes. When we call the run() method, the Kamaelia system starts,
and the pipeline component is activated. It in turn, activates all the
components inside.
How are the components linked together?
Just like unix pipes
"inbox" and "outbox" are a lot like standard-input and standard-output
for command line programs. When you pipe programs together on a unix
shell, the standard-output of one program gets sent to the
standard-input of the next.
"control" and "signal" are analogous to standard-error. In practice
Kamaelia components use it to signal when they are finished.
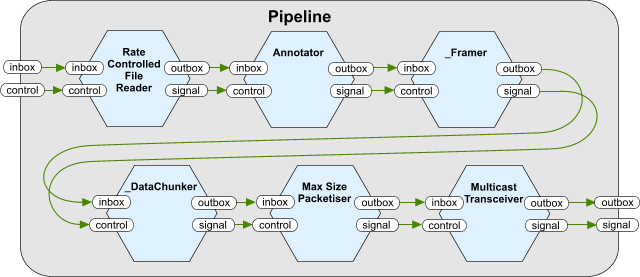
More specifically, Pipeline links one component to the next in the
chain. It links the "outbox" and "signal" outboxes of one component to
the "inbox" and "control" inboxes on the next one:
- The "inbox" and "outbox" boxes are the ones most components use to
take in and send out data. So for example, whatever the
RateControlledFileReader component reads gets sent to the Annotator
component.
- The "control" and "signal" boxes are used to send the shutdown message when a component has finished, and wants to tell the next.
So, if we look at precisely what linkages are made, we see something
like this:
Pipeline is a component too ... time to go modular!
The Pipeline also links its own inboxes and outboxes to the start and
the end (respectively) of the chain. Pipeline is, after all, a component
too, so it makes sense to be able to send and receive messages to/from
the pipeline of components within using its inboxes and outboxes. Think
of it as a kind of container.
You can therefore use a Pipeline as a way to wrap up a useful pipelined
set of components into a single bundle that you can then reuse
elsewhere.
For example, we could separate the components that make the multicast
reliability protocol into another Pipeline, and simply include it like
another component:
Pipeline( RateControlledFileReader("myaudio.mp3",readmode="bytes",rate=128000/8),
          Pipeline( Annotator(),
                     _Framer(),
                     _DataChunker(),
                   ),
          MaxSizePacketiser(),
          Multicast_transceiver("0.0.0.0", 0, "224.168.2.9", 1600),
        ).run()
We don't have to call the run() or activate() method of the inner
pipeline since, just like the other components, they'll all be activated
by the main pipeline when it starts.
In fact, we could actually move that into a completely separate
function, that simply returns the pipeline:
def SRM_Sender():
   return Pipeline( Annotator(),
                    _Framer(),
                    _DataChunker(),
                  )
Now we can call that function to put the sub pipeline into the
chain:
Pipeline( RateControlledFileReader("myaudio.mp3",readmode="bytes",rate=128000/8),
          SRM_Sender(),
          MaxSizePacketiser(),
          Multicast_transceiver("0.0.0.0", 0, "224.168.2.9", 1600),
        ).run()
We can now, for the most part, use SRM_Sender just like any other
component.
This hopefully makes the design of the system more modular and clearer,
and also give us a re-usable component for applying our multicast
reliability protocol - which we previously didn't have. In fact, this
has already been done so you can simply import it and use it:
from Kamaelia.Protocol.SimpleReliableMulticast import SRM_Sender

Pipeline( RateControlledFileReader("myaudio.mp3",readmode="bytes",rate=128000/8),
          SRM_Sender(),
          MaxSizePacketiser(),
          Multicast_transceiver("0.0.0.0", 0, "224.168.2.9", 1600),
        ).run()
Need more flexibility?
Pipelines are not the only quick and easy way to link up components.
Perhaps you need to make different links? Try a Graphline instead.
-- 18 Dec 2006 - Matt Hammond
Cookbook : Graphlines
A Graphline provides a flexible way to link inboxes and outboxes in any way you wish. Whereas a Pipeline constrains your components to be wired into ... a pipeline ... with Graphline you specify each link explicitly.
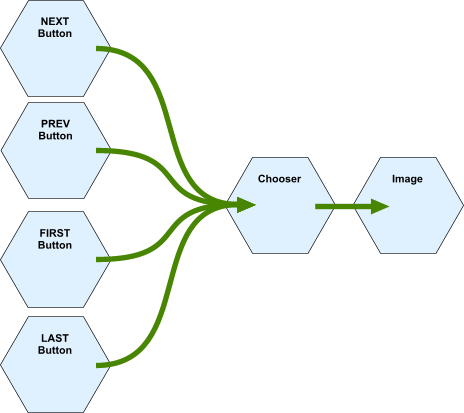
Suppose we want to build a simple slideshow application, where pygame Button components control a Chooser component that sends filenames for each slide to a pygame Image display component:
We could build this by writing a new component with a whole bunch of
self.link() calls to link each outbox to the next inbox. But that is a
lot of code to write and rather tedious! ... surely there must be an
easier way?
... You need the graphline component! No need to write a whole new
component, simply use a Graphline component like this:
from Kamaelia.Chassis.Graphline import Graphline

from Kamaelia.UI.Pygame.Button import Button
from Kamaelia.UI.Pygame.Image import Image
from Kamaelia.Util.Chooser import Chooser

files = [ "slide1.gif", "slide2.gif", .... "slide99.gif" ]

Graphline(
     CHOOSER  = Chooser(files),
     IMAGE    = Image(size=(800,600), position=(8,48)),
     NEXT     = Button(caption="Next",     msg="NEXT", position=(72,8)  ),
     PREVIOUS = Button(caption="Previous", msg="PREV" ,position=(8,8)   ),
     FIRST    = Button(caption="First",    msg="FIRST",position=(256,8) ),
     LAST     = Button(caption="Last",     msg="LAST" ,position=(320,8) ),

     linkages = {
        ("NEXT",     "outbox") : ("CHOOSER", "inbox"),
        ("PREVIOUS", "outbox") : ("CHOOSER", "inbox"),
        ("FIRST",    "outbox") : ("CHOOSER", "inbox"),
        ("LAST",     "outbox") : ("CHOOSER", "inbox"),

        ("CHOOSER",  "outbox") : ("IMAGE",   "inbox"),
     }
).run()
What you see here is slightly abridged for clarity. You can find the
full version in
Kamaelia/Examples/SimpleGraphicalApps/Slideshows
What did we just do? Simple:
Write each component as a named argument
     CHOOSER  = Chooser(files),
     IMAGE    = Image(size=(800,600), position=(8,48)),
     NEXT     = Button(caption="Next",     msg="NEXT", position=(72,8)  ),
     PREVIOUS = Button(caption="Previous", msg="PREV" ,position=(8,8)   ),
     FIRST    = Button(caption="First",    msg="FIRST",position=(256,8) ),
     LAST     = Button(caption="Last",     msg="LAST" ,position=(320,8) ),
...then write the linkages you want as the 'linkages' argument in a dictionary:
     linkages = {
        ("NEXT",     "outbox") : ("CHOOSER", "inbox"),
        ("PREVIOUS", "outbox") : ("CHOOSER", "inbox"),
        ("FIRST",    "outbox") : ("CHOOSER", "inbox"),
        ("LAST",     "outbox") : ("CHOOSER", "inbox"),

        ("CHOOSER",  "outbox") : ("IMAGE",   "inbox"),
     }
For each linkage we want, we write a mapping in the dictionary from a (component, outbox) to a (component, inbox) We refer to the components by the names we just gave them, as strings. We reference the inboxes and outboxes by their names too.
So, for example:
("NEXT","outbox") : ("CHOOSER","inbox")specifies that you want the "outbox" outbox of the "Next" Button to
be linked to the "inbox" inbox of the Chooser.
Making links to the outside world
So the Graphline defined above wires up the Chooser, Image and 4
Button components inside itself - like Pipeline it is a kind of
container:
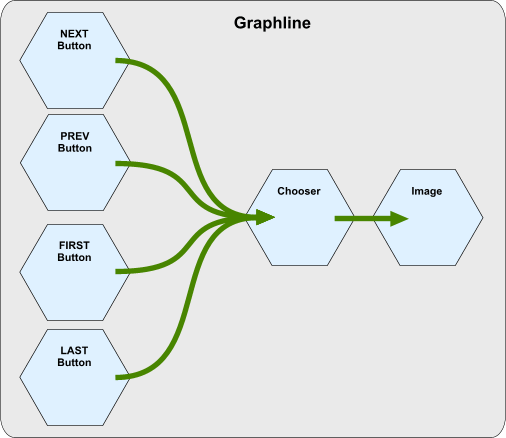
If we look in more detail, the links made are actually like this:
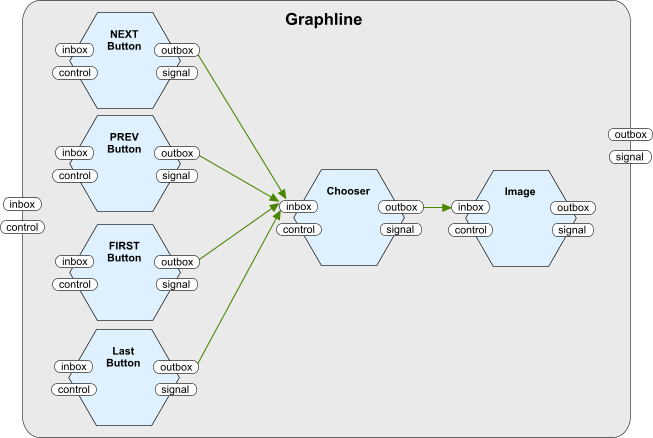
Just like the Pipeline component, a Graphline has its own inboxes and
outboxes. You can specify links to and from these by using the empty
string to name the component.
For example, we might want to be able to send instructions to the
Chooser from outside this graphline, in which case we would add this to
the set of linkages:
("", "inbox") : ("NEXT", "inbox"),By using a name for a component that we've not used (in this case
simply the empty string suffices) we're telling Graphline to use its own
inbox.
We could do the same for outboxes too if we want. For example, we could
ask for the outbox of the Image component to be linked to the
Graphline's outbox:
("IMAGE", "outbox") : ("", "outbox"),In fact, if you also refer to an inbox or outbox name for the
Graphline that does not exist. Graphline will simply create it. This
means you can use a Graphline as a container, giving it whatever inboxes
and outboxes you need - not just the 'standard' ones that most
components have.
Just like with Pipeline, Graphline is a fully fledged component itself,
so you can put a Graphline inside a Pipeline, or a Pipeline inside a
Graphline, or any other combination you care to choose. Again, it can be
a good way of making your system more modular, by separating off a
little group of components into a separate functional unit.
Cookbook : Carousels
So you've built your components and wired them up using Pipelines and Graphlines . But what do you do if you want to create or initialise a component at runtime?
Perhaps you can't know the value of some arguments until you start reading that input file. Or maybe you want to process several streams of data in sequence, but the component you want to use isn't designed to process several streams back to back. This is where a component like the Carousel comes in.
The Carousel gives us a way to create a component on-the-fly in
response to being sent a message.
For example...
Suppose we want to play an MP3 file ... we could use a simple
pipeline like this:
from Kamaelia.File.Reading import RateControlledFileReader
from Kamaelia.Audio.Codec.PyMedia.Decoder import Decoder
from Kamaelia.Audio.PyMedia.Output import Output
from Kamaelia.Chassis.Pipeline import Pipeline

import sys
mp3filename=sys.argv[1]

Pipeline( RateControlledFileReader( mp3filename, readmode="bytes", rate=256000/8),
          Decoder("mp3"),
          Output(sample_rate=44100, channels=2, format="S16_LE"),
        ).run()
That is all very nice; but what if we get the sample rate, number of
channels or format wrong? We can't get this information until we start
decoding it. If we get it wrong then the audio may be corrupted or
played at the wrong speed!
It would be great if, at runtime, we could create the audio playback
(Output) component in response to receiving a message from the MP3
decoder containing the audio format:

The PyMedia MP3 Decoder component we are using helpfully sends out a
message containing the information we need, so we can use the Carousel
component to do it like this:
from Kamaelia.Chassis.Graphline import Graphline
from Kamaelia.Chassis.Carousel import Carousel

def makeAudioOutput(metadata):
    return Output( metadata["sample_rate"],
                   metadata["channels"],
                   metadata["format"]
                 )

Graphline( READ = RateControlledFileReader( mp3filename, readmode="bytes", rate=256000/8),
           DECODE = Decoder("mp3"),
           OUTPUT = Carousel( makeAudioOutput ),
           linkages = {
               ("READ",   "outbox") : ("DECODE", "inbox"),
               ("DECODE", "outbox") : ("OUTPUT", "inbox"),
               ("DECODE", "format") : ("OUTPUT", "next"),

               ("READ",   "signal") : ("DECODE", "control"),
               ("DECODE", "signal") : ("OUTPUT", "control"),
           }
         ).run()
This example is wired up using a Graphline component - find out more
about Graphlines here .
So what does this do?
The MP3 Decoder component we are using helpfully sends out the format
of the decoded audio out of its "format" outbox, so we link this to the
Carousel's "next" inbox to control it. A message from the decoder wil
look like this:
{ "sample_rate" : 44100, "channels":2, "format":"S16_LE" }
We've also written a function makeAudioOutput(). When called with the message as its argument; it returns a new Output component set up with the right sample rate, number of channels, and format.
We give this function to the Carousel. Note that we don't call it - we just give it the function. The Carousel calls it when it receives a message on its "next" inbox and therefore needs to create the component:
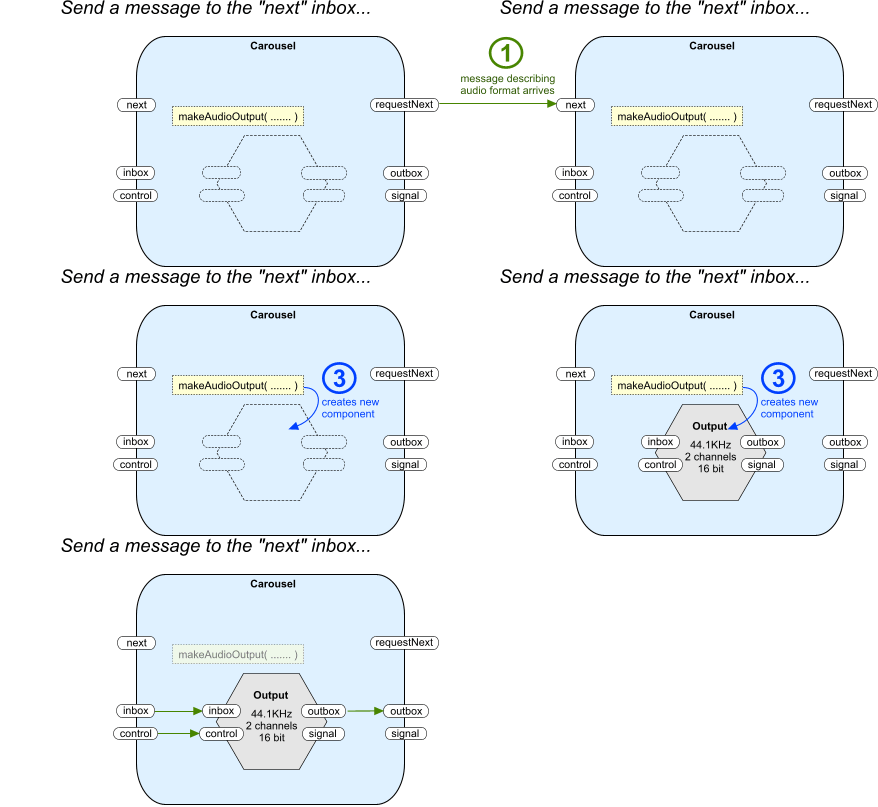
- The Carousel receives a message on its "next" inbox, containing the
format of the audio
- The Carousel calls our makeAudioOutput function, passing it
this message as its parameter
- Our function returns a new Output component, ready to be used.
- Carousel links the new Output component up to use its own inboxes and outboxes
So when the raw audio samples start to arrive at its inbox, there
will be a new Output component already linked in to receive them.
Note that it does not link the "signal" outbox - this is so that when
the component finishes and sends its own shutdown message, this doesn't
get passed on - after all, you might want to reuse the Carousel with
another component.
So why is it called a "Carousel" then?
If you send another message to the "next" inbox, then the component
gets replaced. Any existing component is told to shutdown and is thrown
away as soon as possible, and a new one is created, by calling our
function with the new message as the parameter.
This kind of behaviour is a little like the carousel on an old slide
projector - when you want to move on, the old item is swapped for the
next one. Alternatively think of a fairground merry-go-round carousel -
where one horse comes by after another.
For example, suppose we want to improve our MP3 player by making it play
multiple files back to back. We could put everything in a Carousel, then
when it has finished, it could send us a message. We could then respond
by sending it the next filename to play, and letting it start again.
Something like this:

We can do this by using a Chooser component for the playlist and putting our existing player inside a Carousel. When all the player components finish, our Carousel will send out a "next" message from its "requestNext" outbox, which we can use to cause our Chooser to send back the next filename:

Notice that we can also wire up the "signal" and "control" boxes, so
that when the Chooser has no more names in its playlist, it can tell our
player Carousel to shut down.
So now lets build this! First, lets make a function that we will give
to the Carousel for it to use to create our player:
def makePlayer(mp3filename):
    return Graphline(
        READ = RateControlledFileReader( mp3filename, readmode="bytes", rate=256000/8),
        DECODE = Decoder("mp3"),
        OUTPUT = Carousel( makeAudioOutput ),
        linkages = {
            ("READ",   "outbox") : ("DECODE", "inbox"),
            ("DECODE", "outbox") : ("OUTPUT", "inbox"),
            ("DECODE", "format") : ("OUTPUT", "next"),

            ("",      "control") : ("READ",   "control"),
            ("READ",   "signal") : ("DECODE", "control"),
            ("DECODE", "signal") : ("OUTPUT", "control"),
            ("OUTPUT", "signal") : ("",       "signal"),
        }
      )
This is almost identical to our player from before. Notice we've
added extra links to make sure shutdown messages can get into and out of
the Graphline. This is important, as Carousel will be listening for our
Graphline sending the shutdown message.
Now lets wire it all up! We will use a ForwardIteratingChooser
because it will send a shutdown message once all the filenames have been
iterated over:
from Kamaelia.Util.Chooser import ForwardIteratingChooser

filenames = argv[1:]

Graphline( PLAYLIST = ForwardIteratingChooser(filenames),
           PLAYER   = Carousel( makePlayer, make1stRequest=True ),
           linkages = {
               ("PLAYER",   "requestNext") : ("PLAYLIST", "inbox"),
               ("PLAYLIST", "outbox")      : ("PLAYER",   "next"),

               ("PLAYLIST", "signal") : ("PLAYER", "control"),
           }
         ).run()
Notice that we have asked the Carousel to make the 1st request. What
this means is that as soon as it starts it will send out its request for
the next item - instead of just waiting. This gets things going.
So there we have it, a simple mp3 playlist system, built entirely in
Kamaelia, using Carousels to create components with the right settings
when we need them.
-- 19 Dec 2006 - Matt Hammond
Cookbook : Backplanes
Backplanes provide an easy way to distribute data from many sources
to many destinations. For example
Serving to multiple clients
For example, perhaps we want to build a server where each client that connects receives a copy of a stream of data - perhaps the current time. First, lets create our source of time data:
from Axon.ThreadedComponent import threadedcomponent
import time

class TimeTick(threadedcomponent):
    def main(self):
        prev=""
        while 1:
            now = time.asctime() + "\n"
            if now!=prev:
                self.send(now, "outbox")
                prev=now
            else:
                self.pause(0.1)
We're going to use SimpleServer to provide a simple TCP server to
clients. Every time a client connects, we could make a new, private
instance of TimeTick to handle that client. Alternatively we could make
a single TimeTick component that sends (publishes) its messages to a
Backplane:
from Kamaelia.Util.Backplane import Backplane
from Kamaelia.Util.Backplane import PublishTo
from Kamaelia.Chassis.Pipeline import Pipeline

Backplane("TIME").activate()

Pipeline( TimeTick(),
          PublishTo("TIME"),
        ).activate()
Then for each client that connects, we ask SimpleServer to make a
component that fetches (subscribes) from that same backplane:
from Kamaelia.Util.Backplane import SubscribeTo
from Kamaelia.Chassis.ConnectedServer import SimpleServer

SimpleServer(protocol=lambda : SubscribeTo("TIME"), port=1500).run()
So what's going on?
Notice we've named the Backplane "TIME" to distinguish it from other
Backplanes. You can therefore have as many Backplanes in a system as you
like. The SubscribeTo and PublishTo components connect to the right
backplane because they look it up (by the name) using the Coordinating
Assistant Tracker (CAT). Once the subscribers and publishers are all
linked up, you get something like this:
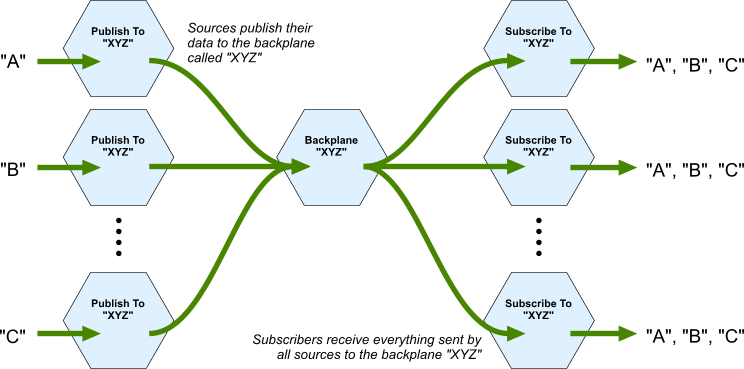
PublishTo components send anything that arrives at their "inbox" inbox
onto the Backplane. SubscribeTo components talk to the backplane and
send on anything they receive from it to their "outbox" outbox. The
Backplane itself acts like a splitter component - anything it receives
is sent onto all outputs; in this case - all subscribers.
Couldn't we have done that more simply?
For a really simple example like this, there is little or no benefit of doing it this way ... in fact, it might seem like unnecessary extra effort and components! However, the real power is that all the clients are sharing the same data source.
A simple relay server
Perhaps, for example, our source of data is actually coming from another server (say "foo.bar.com" on port 1600). Using a backplane, its easy to build a relay server capable of replicating the data to multiple clients:
from Kamaelia.Internet.TCPClient import TCPClient

Pipeline( TCPClient("foo.bar.com", port=1600),
          PublishTo("DATA"),
        ).activate()

Backplane("DATA").activate()

SimpleServer(protocol=lambda : SubscribeTo("DATA"), port=1600).run()
An aggregating logger...
Backplanes aren't just useful for distributing data in a one-to-many fashion; they can also be used for many-to-one or many-to-many. For example, we can use a Backplane to build a logging server capable of logging, to a single file, data received from multiple clients. In effect, a simple aggregating logger:
from Kamaelia.Visualisation.PhysicsGraph.chunks_to_lines import chunks_to_lines
from Kamaelia.File.Writing import SimpleFileWriter

def sendToBackplane():
    return Pipeline( chunks_to_lines(),
                      PublishTo("LOGGER"),
                    )

SimpleServer(protocol=sendToBackplane, port=1500).activate()

Pipeline( SubscribeTo("LOGGER"),
          SimpleFileWriter("log.data"),
        ).activate()

Backplane("LOGGER").run()
...that can also be a relay
Because we use a Backplane and a SimpleServer chassis, the client connections are not hard wired - clients can connect and disconnect whenever they choose. In fact, we could extend this further, by allowing clients to connect on a different port to receive a live stream of the aggregated logging data:
SimpleServer(protocol=SubscribeTo("LOGGER"), port=1501).activate()
Our aggregating logger is now also a relay, using the backplane to distribute messages from many sources to many destinations.
-- Jan 2007, Matt
Build TCP Based Clients and Servers
Cookbook Example
How can I...?
Example 1: Building a Simple TCP Based Server that allows multiple connections at once and sends a fortune cookie to the client. Includes simple TCP based client that displays the fortune cookie. Components used:SimpleServer, FortuneCookieProtocol, Pipeline, TCPClient, ConsoleEchoer
Cookbook Example
How can I...?
Example 2: A Simple TCP Based Server that allows multiple connections at once, but sends a random ogg vorbis file to the client. Includes a simple TCP based client for this server, that connects to the server, decodes the ogg vorbis audio and plays it back. Components used:pipeline, SimpleServer, ReadFileAdaptor, TCPClient, VorbisDecode, AOAudioPlaybackAdaptor
Cookbook Example
How can I...?
Example 3: Same as example 2, but as separate scripts. Components used in server script: SimpleServer, ReadFileAdaptor. Components used in client script: pipeline, TCPClient, VorbisDecode, AOAudioPlaybackAdaptor .
Server script
Client script
Build Multicast Based Clients and Servers
Cookbook Example
How can I...?
Example 4: Building a very simplistic multicast based streaming system using ogg vorbis. Components used:component, ReadFileAdaptor, VorbisDecode, AOAudioPlaybackAdaptor, Multicast_transceiver, pipeline
Cookbook Example
How can I...?
Example 4: Building a very simplistic multicast based streaming system using ogg vorbis. This time using 2 separate scripts. Components used in server script:component, ReadFileAdaptor, Multicast_transceiver. Components used in client script: component, Multicast_transceiver, detuple (defined in the example), VorbisDecode, AOAudioPlaybackAdaptor.
Server Script, the easy way
Server Script, the hard way (but exactly equivalent)
Client Script
Client Script, the hard way (but exactly equivalent)
Cookbook Example
How can I...?
Example 4: Building some reliability into the system (Simple Reliable Multicast). Idea is to show layering of protocols.Components used:component, ReadFileAdaptor, VorbisDecode, AOAudioPlaybackAdaptor, Multicast_transceiver, pipeline, SRM_Sender, SRM_Receiver
Create UDP Based Systems
Build tools for System Visualisation and Introspection
- IntrospectingASimpleStreamingSystem
- NetworkControllableGraphViewer
- BuildingACustomisedTopologyViewer
Build Multimedia Applications
- SimplestPresentationTool
- TopologySlideshowComponent
- TopologyAndSlidesPresentationTool
- SimpleTextTickerDemonstration
Working with Open GL
Coming soon! (open
GL examples already in subversion here)
Write Games
Work with Audio and Video
- SimplestPossibleDiracVideoPlayer
- DiracVideoEncodeAndDecodeChain
- SimpleStreamerWithPlaylistCapability
- SimpleClientForSavingContentsOfTCPStream
Working with HTTP
- HTTPServer - How can I integrate a web server into my system? This is a relatively low level component, but does form a base for doing lots of interesting things.
- HTTPClient - How can I
integrate a web client into my system? How can
I deal with RSS feeds?
Working with BitTorrent
Working with AIM
Working with IRC
Receiving and recording DVB broadcasts
- TransportStreamCapture
- how can I capture an entire transport stream? (a DVB multiplex puts
multiple channels inside a transport stream)
- TransportStreamDemuxer
- how can I work with multiple channels from a
transport stream? (yes, you can deal with more than one at a time easily
:)
- SingleChannelTransportStreamCapture
- How can I work with a single channel from a transport
stream?
- RecordNamedChannel
- Numbers numbers numbers! I want to record BBC ONE! How can I use
named channels ?
- PersonalVideoRecorder
- How can I record named programmes from a specific
channel? (without even specifying the time ? :-)
As an aside, I don't think the rounded boxes idea here was working
very well. In theory it was nice, but the actual resulting layout sucked
in practice. As a result I've reverted to something more traditional. If
anyone has a better idea, please change to that :-) -- Michael, 10 Feb
2007
